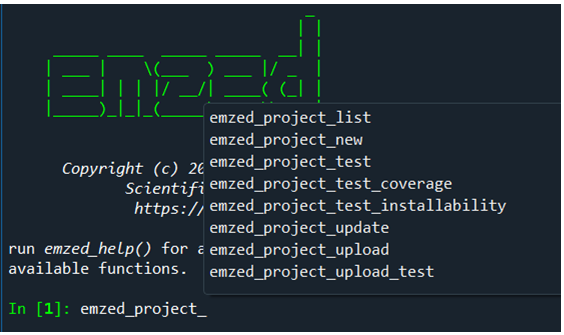
11 emzed Projects
emzed supports developing and sharing your projects (workflows) with other emzed users directly or via PyPi. Note, to share your project via PyPi you have to register first. It allows you to create installable extensions. To get familiar with the procedure we will build an example project. All project related commands start with emzed_project_...
Initializing projects
To create a new project type:
emzed_project_new('test_project')

create virtual env at C:\Users\pkiefer\AppData\Roaming\emzed3\emzed3_projects\test_project\.venv
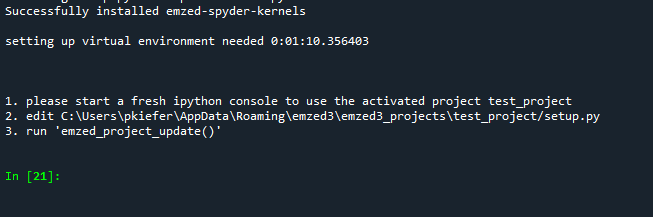
As you might have realized, initializing a new project takes a moment. This is because for each project a virtual environment with the current versions of all used packages is created, including the current emzed version, to minimize version conflict issues of the used packages.
After initializing project is finished you are asked to ...
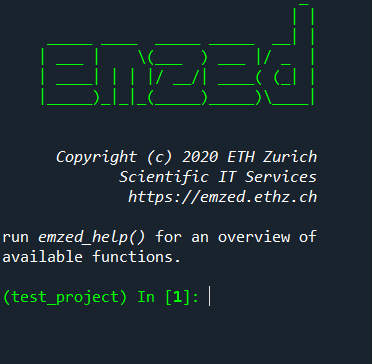
After closing the current and opening a new console, the active project test_project is indicated at the beginning of the command line.
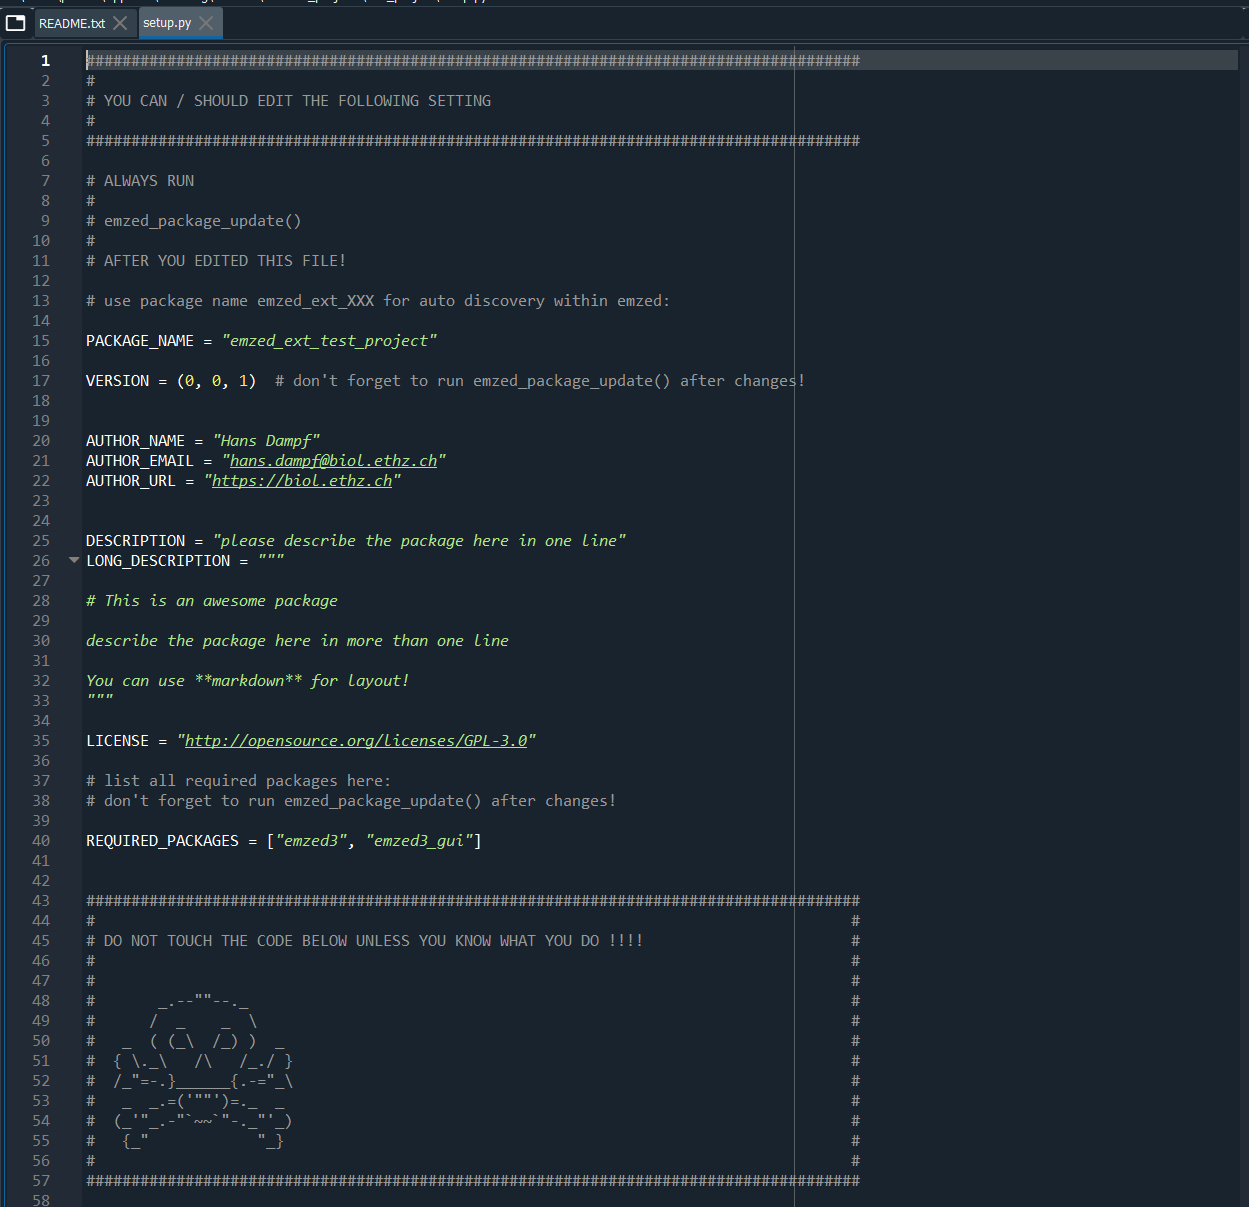
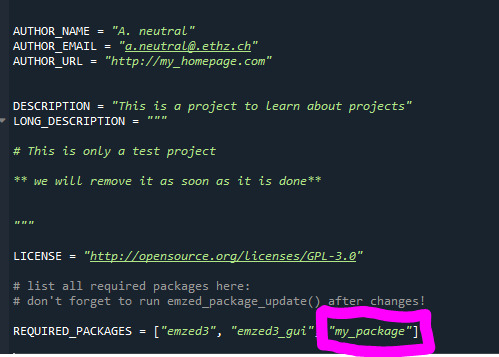
Moreover, a file setup.py was opened in the Spyder editor. It contains basic project information e.g. version, author, and a short description of the package. The setup also provides a GNU license protecting your project authorship. Just fill in the required information.
Finally, we save the file and we run the command:
emzed_project_update()
We can use the Spyder file browser to closer inspect the project structure:
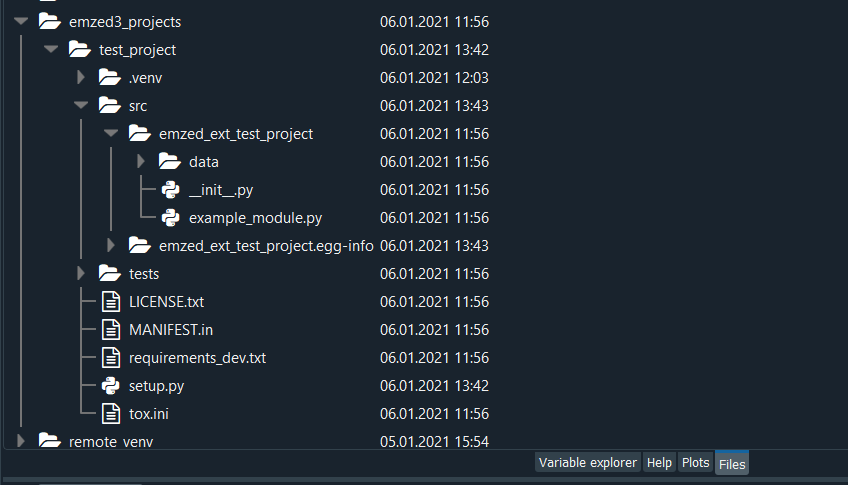
Our project test_project is a subfolder of emzed3_projects. test_project contains the setup.py we have just modified. Moreover, it contains the 3 subfolders .venv, src, and tests. All project scripts will be saved in
./src/emzed_ext_test_project. By default, the folder contains already the files __init__.py and example_module.py.
By clicking the file __init__.py it will open in the editor.
import pkg_resources

__version__ = tuple(map(int, pkg_resources.require(__name__)[0].version.split(".")))


# IMPORTS WHICH SHOULD APPEAR IN emzed.ext.test_project
# AFTER INSTALLING THE PACKAGE:
from .example_module import compute
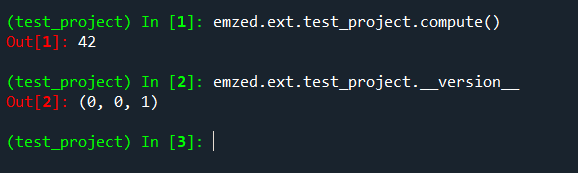
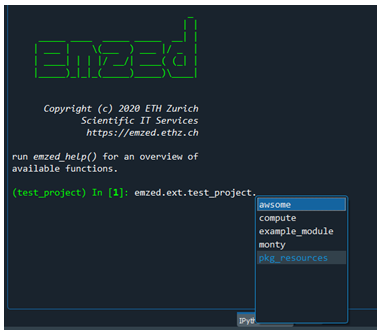
Most important: the __init__ file handles the project namespace. You can design your namespace by importing different modules or module functions. By default, the current namespace of test_project contains the function compute from example_module. We can now access the project namespace via emzed.ext.'my_project' as shown here:
Next, we will add a new module awesome.py to the project by saving it into:
./src/emzed_ext_test_project
and we will add a function to our module awesome:
def monty():
    return 'Python'
Now we will update again the __init__ file to add the function monty to test_project namespace:
from .awesome import monty
Note the . prior to the module name is important, since it refers to the local project path.
After saving and opening a new console, we can execute:

Remark: the command emzed_project_activate('project_name')allows switching between projects. If you do not provide a name, an indexed list of all existing projects is provided and you can select a project by index. With the command emzed_project_deactivate(), you can leave the project environment.
Code testing
emzed3 features Pytest for better code development. With increasing project complexity, testing becomes mandatory to obtain stable code. emzed3 provides a structured testing environment.
All code tests scripts are saved in the tests subfolder. It already contains the file test_test_project.py, containing tests for example_module:
from emzed_ext_test_project import compute
from emzed_ext_test_project.example_module import \
    path_to_data_file


def test_compute():
    assert compute() == 42


def test_read_data_file():
    with open(path_to_data_file("readme.txt")) as fh:
        txt = fh.read()
    assert txt != ""
We can run the tests with the command
emzed_project_test()
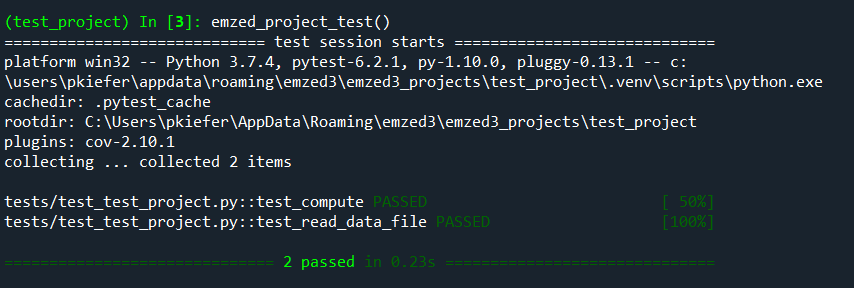
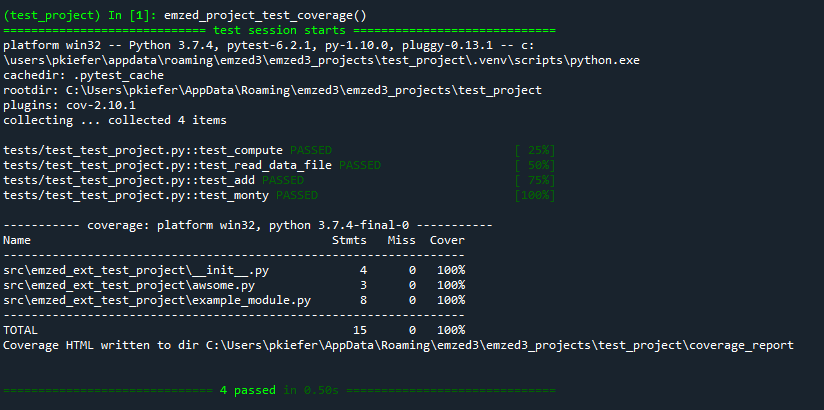
As we can see, both test pass. The next important question is about test completeness. How much of our code is covered by the current tests? We can check this with the command
emzed_project_test_coverage()
resulting
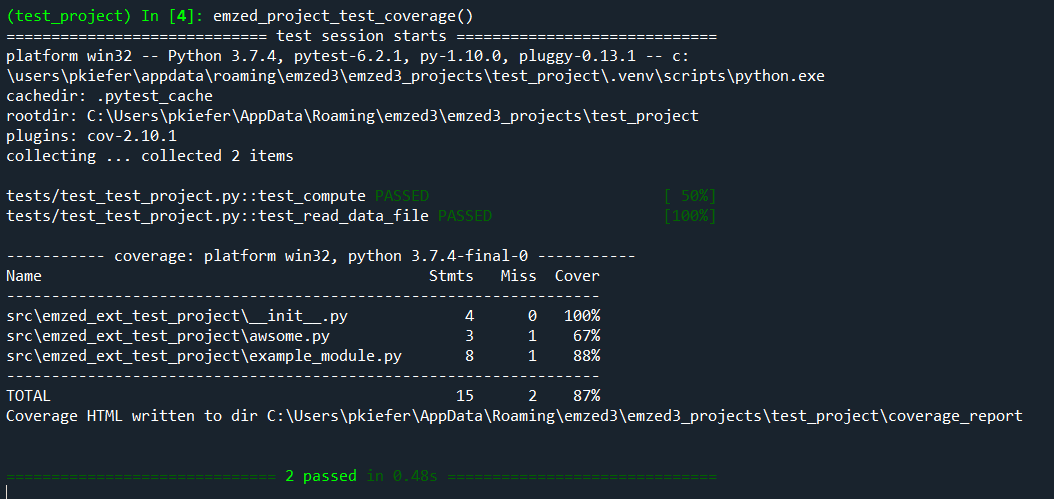
The command not only runs the test but also analyzes how much of the code is covered by the current test of all project modules. Currently, tests only partially cover the code of modules example_module and awesome. Note, the coverage of awesome is already 67 % although we did not write any test. This is due to empty lines and comments in the module, which do not require a test but will be counted to determine the percentage of module code tested.
To yield complete code coverage, two more tests are required.
example_modulehas the function
add(a, b)
A test function could look like:
def test_add():
    a = 3.3
    b = 2.5
    assert add(a,b) == a + b
awesomehas the function
monty()
An obvious test function would be:
def test_monty():
    assert monty() == 'Python'
We can now add both tests to the provided test file. Before we can run the tests, we have to import monty first. The resulting test script looks like this:

Now we can execute again the command
emzed_project_test_coverage()
resulting in:
Tests cover now 100% of the code. Note, this does not mean that the code is fine because not all use cases have been tested.
To share the code with other users, two more steps are missing. To test whether the current emzed project is installable, we have to run:
emzed_project_test_installability()
Note, running the command might take a while since all previous commands will be executed again. Though time consuming, such procedure guarantees that all required quality checks were applied to the current version. Now the project is ready to be shared.
Sharing projects
emzed features two ways of project sharing. If you want to distribute your project only to a limited number of users e.g. to your coworkers, the easiest way to do so is creating a wheel. In emzed, you can create the wheel with the command:
emzed_project_build_wheel()
REMARKS:
Each time you update your project, you should also change the version number. emzed uses a sequence-based scheme, where each version is a sequence of numbers separated by dots
.e.g.,1.1.23, following the schemeMAJOR.MINOR.MICRO. Good practice about on how to handle version changes are explained in detail here.To distribute your code to a larger community, you can make it available via the Python Package Index PyPI. Since emzed projects are fully packaged, you can upload them directly to PyPI without further processing. As already mentioned above it is necessary to register first. Once this is done, we can share the project. It is good practice to upload your package to the TestPyPI instance.
Make sure your project was built with the latest emzed version. Remember each project has its own virtual environment. You can upgrade the version of your emzed project by executing the command
emzed_update()when the project is activated.
Since the publishing procedure on PyPI and on TestPyPI is identical we will demonstrate the principle on the test instance. Note, the command
emzed_project_build_wheel()
must be executed first!
To publish on PyPI use the command
emzed_project_upload()
Installing emzed projects
You can install all emzed projects as extensions using the pip install command.
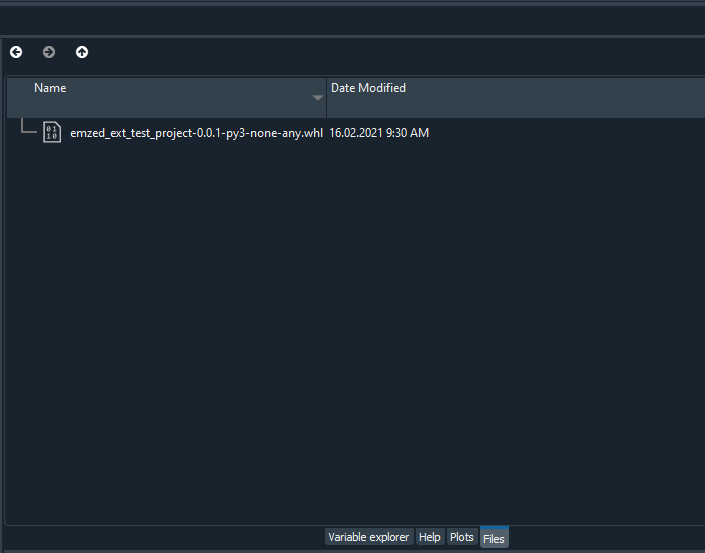
To install an emzed project as wheel from a local source, we select the folder containing the wheel file in the Spyder file browser window:
And we can install the wheel directly:
pip install emzed_ext_test_project-0.0.1-py3-none-any.whl
Alternatively, you can also provide the path to the wheel relative to the current folder. After opening a new IPython console the project will be available as extension:
Installing third party Python packages
The emzed project environment allows you to test and install other Python packages safely, since each project has its own virtual environment and potential conflicts with the emzed core packages will not harm your emzed installation. For instance, to add my_package, do the following:
- Create a new or activate an existing project
emzed_project_new('name')
or
emzed_project_activate()
Open emzed project
setup.pyAdd the package to requirements
- Run
emzed_project_update()
Test whether the installed package is compatible with emzed.
To add other required packages continue with step 2)
Compatible packages might be installed directly using pip install.
Note: In that particular case it does not make much sense uploading the package to PyPI or creating a wheel. In case you feel there is a general high demand for a certain package by the emzed community, you can directly ask the developers to integrate the package into emzed3.